TensorFlow Lite is TensorFlow’s lightweight solution to run TensorFlow models on mobile, embedded and IoT devices with low latency quickly. With TensorFlow Lite we can perform classification and regression task without incurring server cost.
TensorFlow Lite model supported on both Andriod and iOS via C++ and Java API. Generally, the size of the TensorFlow model is quite big that we can’t run it as it is on mobile and other embedded devices with limited compute and memory resources. So to make it possible to run TensorFlow model on low processing devices, TensorFlow introduces a lightweight solution i.e TensorFlow Lite.
In the following tutorial series, you will get to know about TensorFlow Lite in details :
- How to convert trained Tensorflow model to TFLite using TFLite converter
- How to run TFLite model in Android app
- How to run TFLite model in iOS app
- How to run TFLite model in raspberry pi
Before we start with TFLite, we need a trained model that is trained on a set of data using a high powered machine. This trained model can be converted to TensorFlow Lite format. We cannot create or train a model using TensorFlow Lite. So, we must start with a regular TensorFlow model and then convert it to TFLite.
A TensorFlow model is a data structure that contains the logic and knowledge of the neural network. The trained model consists of various model files and a set of associated checkpoints. This model can be exported to be used on the mobile device.
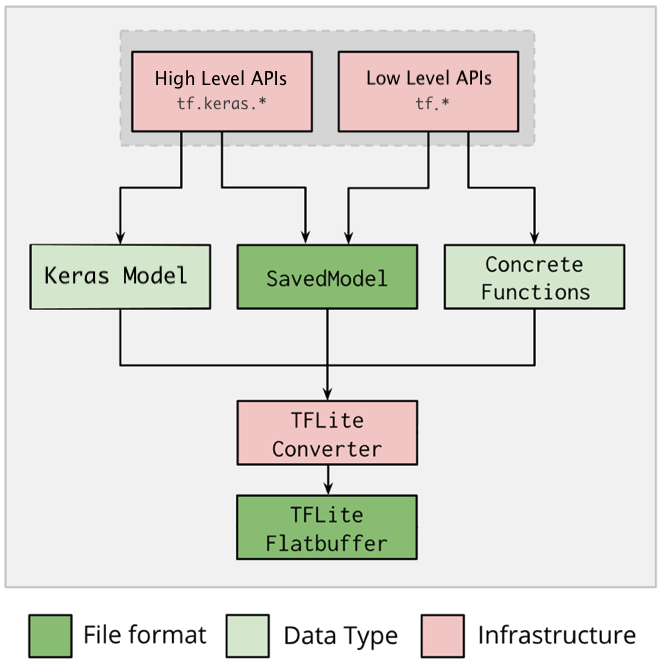
The above diagram represents the standard flow to convert TensorFlow model to TensorFlow Lite. First, we need to train our model using TensorFlow’s high-level API like Keras or low-level API. Once we trained the model, we can save the model in various formats depending on the API that we have used while training. We can save our model either HDF5 file or SavedModel format if the model is trained using Keras. On other hand, if the model is trained using low-level API, we can save the model in SavedModel format or as a concrete function.
The next step is to convert the saved TensorFlow model to TensorFlow Lite model using TFLite converter. TensorFlow Lite model is an optimized FlatBuffer format identified by the .tflite file extension. Flatbuffers is a special serialization format that is optimized for performance.
We can deploy TFLite model on a mobile or embedded device and run it locally on these devices using TensorFlow Lite interpreter.
Trained a TensorFlow Model
Let’s a build simple Convolutional Neural Network (CNN) to classify CIFAR images. In this tutorial, the model is trained using the Keras API.
Import TensorFlow
import tensorflow as tf

from tensorflow.keras import datasets, layers, models
import matplotlib.pyplot as plt
import numpy as np

tf.__version__
'2.3.1'
Download and prepare the CIFAR10 dataset
The CIFAR10 dataset consists of 60,000 images in 10 classes, with 6,000 images in each class. The dataset has 50,000 training images and 10,000 testing images.
(train_images, train_labels), (test_images, test_labels) = datasets.cifar10.load_data()

# Normalize pixel values to be between 0 and 1
train_images, test_images = train_images / 255.0, test_images / 255.0
Downloading data from https://www.cs.toronto.edu/~kriz/cifar-10-python.tar.gz
170500096/170498071 [==============================] - 1093s 6us/step
class_names = ['airplane', 'automobile', 'bird', 'cat', 'deer', 'dog', 'frog', 'horse', 'ship', 'truck']
Build & Train the Model
Let’s a build and train simple Convolutional Neural Network (CNN) architecture on CIFAR10 train data.
model = models.Sequential()
model.add(layers.Conv2D(32, (3, 3), activation='relu', input_shape=(32, 32, 3)))
model.add(layers.MaxPooling2D((2, 2)))
model.add(layers.Conv2D(64, (3, 3), activation='relu'))
model.add(layers.MaxPooling2D((2, 2)))
model.add(layers.Conv2D(64, (3, 3), activation='relu'))

model.add(layers.Flatten())
model.add(layers.Dense(64, activation='relu'))
model.add(layers.Dense(10))

model.compile(optimizer='adam',
loss=tf.keras.losses.SparseCategoricalCrossentropy(from_logits=True),
metrics=['accuracy'])

history = model.fit(train_images, train_labels, epochs=10,
validation_data=(test_images, test_labels))
Epoch 1/10
1563/1563 [==============================] - 27s 17ms/step - loss: 1.5473 - accuracy: 0.4386 - val_loss: 1.2637 - val_accuracy: 0.5478
Epoch 2/10
1563/1563 [==============================] - 23s 15ms/step - loss: 1.1778 - accuracy: 0.5810 - val_loss: 1.1323 - val_accuracy: 0.5976
Epoch 3/10
1563/1563 [==============================] - 24s 15ms/step - loss: 1.0363 - accuracy: 0.6364 - val_loss: 1.1376 - val_accuracy: 0.5918
Epoch 4/10
1563/1563 [==============================] - 26s 16ms/step - loss: 0.9444 - accuracy: 0.6671 - val_loss: 1.0019 - val_accuracy: 0.6496
Epoch 5/10
1563/1563 [==============================] - 24s 15ms/step - loss: 0.8814 - accuracy: 0.6929 - val_loss: 1.0200 - val_accuracy: 0.6463
Epoch 6/10
1563/1563 [==============================] - 26s 17ms/step - loss: 0.8262 - accuracy: 0.7118 - val_loss: 0.9130 - val_accuracy: 0.6802
Epoch 7/10
1563/1563 [==============================] - 31s 20ms/step - loss: 0.7832 - accuracy: 0.7248 - val_loss: 0.9493 - val_accuracy: 0.6733
Epoch 8/10
1563/1563 [==============================] - 25s 16ms/step - loss: 0.7412 - accuracy: 0.7391 - val_loss: 0.9036 - val_accuracy: 0.6924
Epoch 9/10
1563/1563 [==============================] - 24s 15ms/step - loss: 0.7075 - accuracy: 0.7513 - val_loss: 0.8870 - val_accuracy: 0.6957
Epoch 10/10
1563/1563 [==============================] - 24s 15ms/step - loss: 0.6747 - accuracy: 0.7614 - val_loss: 0.8922 - val_accuracy: 0.6986
Evaluate the Model
test_loss, test_acc = model.evaluate(test_images, test_labels, verbose=2)
313/313 - 1s - loss: 0.8922 - accuracy: 0.6986
Convert to a TensorFlow Lite Model
TensorFlow Lite Converter is a Python API that converts trained Tensorflow model into TensorFlow Lite format. The TensorFlow Lite converter enables us to reduce the model file size by applying a various degree of quantization with little degradation in the model accuracy. Quantization used to reduce the precision of model’s parameters which by default are 32-bit floating-point numbers. Below list is types of various degree of quantization available in TensorFlow Lite:
- Post-training float16 quantization
- Post-training dynamic range quantization
- Post-training integer quantization
These quantization techniques allow us to reduce the model size that can fit in low computation devices. You can refer to this tutorial to get to know each quantization techniques in details with example. The following example converts a model into TFLite model with no quantization.
There are various methods exist to convert TensorFlow model to TensorFlow Lite model. Below are the available options:
When converting tensorFlow 2.x models using tf.lite.TFLiteConverter
- tf.lite.TFLiteConverter.from_saved_model() (recommended): Converts a SavedModel.
- tf.lite.TFLiteConverter.from_keras_model(): Converts a Keras model.
- tf.lite.TFLiteConverter.from_concrete_functions(): Converts concrete functions.
When converting tensorFlow 1.x models using tf.compat.v1.lite.TFLiteConverter
- tf.compat.v1..lite.TFLiteConverter.from_saved_model() (recommended): Converts a SavedModel.
- tf.compat.v1.lite.TFLiteConverter.from_keras_model_file(): Converts a Keras model.
- tf.compat.v1.lite.TFLiteConverter.from_frozen_graph(): Converts a Frozen GraphDef from a file.
- tf.compat.v1.lite.TFLiteConverter.from_session(): Converts a GraphDef from a session.
You can refer to this tutorial to get to know about each above TFLiteConverter() methods in details. Here, let’s convert the Keras model into TensorFlow Lite using tf.lite.TFLiteConverter.from_keras_model() function.
converter = tf.lite.TFLiteConverter.from_keras_model(model)
tflite_model = converter.convert()
open("cifar10_model.tflite", "wb").write(tflite_model)
493624
Here, the return value 493624 is the size (in bytes) of the generated TensorFlow Lite model with no quantization. We can even significantly reduce the TFLite model size by applying quantization. Refer this tutorial to learn about quantization methods.
Run inference with the TFLite model
The converted TFLite model can be executed on mobile, embedded and IoT devices. The TensorFlow Lite Interpreter used to run an inference with TFLite model. TensorFlow Lite Interpreter is a library that takes a TFLite model file, executes the operations on input data and provide output.
Interpreter support multiple platforms and provide API to execute TFLite model from Java, C++, Python, Swift and Objective-C.
You can refer to this tutorial to run an inference with TFLite model using all above mention platform. Here, let’s make a prediction on the test image using TensorFlow Lite with Python. Python is a great platform to run TFLite model on embedded devices based on Linux such as Raspberry Pi and Coral.
We need to install TensorFlow Lite interpreter package to run TensorFlow Lite model with Python. We don’t require full TensorFlow packages to installed on embedded devices. This interpreter-only package is a small part of the entire TensorFlow library that only include the required code to run TFLite model. It is a very lightweight package.
Install TensorFlow Lite Interpreter
To install, run pip3 install wheel URL Select device appropriate Python wheel URL from this link.
Execute TensorFlow Lite Interpreter in Python
To distinguish this interpreter-only package from the full TensorFlow package, the Python module provided in the above wheel is named tflite_runtime.
So instead of importing Interpreter from the TensorFlow module, you need to import it from tflite_runtime. However, you can also test the TFLite model on full TensorFlow module.
Import TensorFlow & Load TFLite model
If you are running TFLite model on full TensorFlow package:
import tensorflow as tf
interpreter = tf.lite.Interpreter(model_path='cifar10_model.tflite')
interpreter.allocate_tensors()
If you are running TFLite model on the interpreter-only package:
import tflite_runtime.interpreter as tflite
interpreter = tflite.Interpreter(model_path='cifar10_model.tflite')
interpreter.allocate_tensors()
# Get input and output tensors
input_details = interpreter.get_input_details()
output_details = interpreter.get_output_details()
Let’s print the input_details and output_details variable. The input_details represents the pieces of information related to input data formats such as the shape of input data, the data type of input and other various information related to quantization. And output_details contains information related to the model output format.
input_details
[{'name': 'conv2d_input',
  'index': 0,
  'shape': array([ 1, 32, 32,  3], dtype=int32),
  'shape_signature': array([-1, 32, 32,  3], dtype=int32),
  'dtype': numpy.float32,
  'quantization': (0.0, 0),
  'quantization_parameters': {'scales': array([], dtype=float32),
   'zero_points': array([], dtype=int32),
   'quantized_dimension': 0},
  'sparsity_parameters': {}}]
output_details
[{'name': 'Identity',
  'index': 19,
  'shape': array([ 1, 10], dtype=int32),
  'shape_signature': array([-1, 10], dtype=int32),
  'dtype': numpy.float32,
  'quantization': (0.0, 0),
  'quantization_parameters': {'scales': array([], dtype=float32),
   'zero_points': array([], dtype=int32),
   'quantized_dimension': 0},
  'sparsity_parameters': {}}]
Run the interpreter on a test image
test_image = np.expand_dims(test_images[1], axis=0).astype(np.float32)

plt.figure(figsize=(2,2))
plt.imshow(test_images[1])
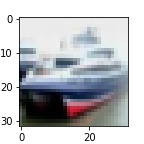
interpreter.set_tensor(input_details[0]['index'], test_image)
interpreter.invoke()
predictions = interpreter.get_tensor(output_details[0]['index'])

prediction_class = np.argmax(predictions)
prediction_class_name = class_names[prediction_class]
prediction_class_name
'ship'